Tìm hiểu How To Fix Usb Device Not Recognized In Windows 10, Cách Sửa Lỗi Usb Not Recognized Windows 10
Bình luận How To Fix Usb Device Not Recognized In Windows 10, Cách Sửa Lỗi Usb Not Recognized Windows 10 là ý tưởng trong nội dung hiện tại của blog Vũ Đế. Đọc bài viết để biết đầy đủ nhé.
This page offers six solutions to fix the USB device not recognized issue in Windows 10/8/7/XP. If you get this error message “The last USB device you connected to this computer malfunctioned, Windows does not recognize it” or you cannot open your device, accessing data, read this article to fix this issue without data loss.
Đang xem: How to fix usb device not recognized in windows
![]()
About the Author
![]()
Reviews and Awards
6 Fixes| USB Device Malfunctioned and Not Recognized
Here is the solutions to the USB device malfunctioned and is not recognized issue. If you are having this USB device error, don”t worry. Quick access to the methods below to make your USB recognizable and work again.
| Fix 1. Unplug Computer | Shut down computer > Unplug the power cable…Full steps |
| Fix 2. Change USB Cable/Port | Check all the available USB cables and ports…Full steps |
| Fix 3. Update Device Driver | Navigate to the Driver tab, choose Update Driver…Full steps |
| Fix 4. Fix USB Root Hub | In Device Manager > Expand Universal Serial Bus…Full steps |
| For More Fixes | Change USB settings and reinstall USB driver…Full steps |
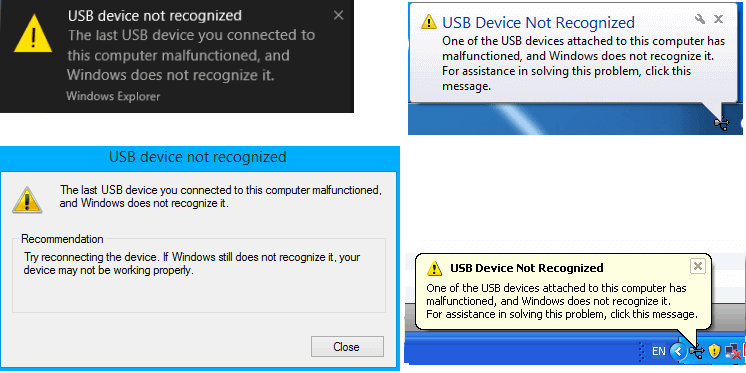
“USB device not recognized” is an error that usually occurs to the Windows computer when you plug in a USB device. When Windows generates such an error, the USB will not show up on your computer, and you can”t access your data. In different situations, the error is followed by different messages.
“The last USB device you connected to this computer malfunctioned, and Windows does not recognize it.”
“One of the USB devices attached to this computer has malfunctioned, and Windows does not recognize it. For assistance in solving this problem, click this message.”
How to Fix USB Device Not Recognized in Windows
If your device is not recognized at the moment, you can try the below six solutions to make it show up again. We strongly recommend you follow the sequence. Because there are many reasons might lead to Windows failed to recognize the USB device, each method corresponds to a different reason.
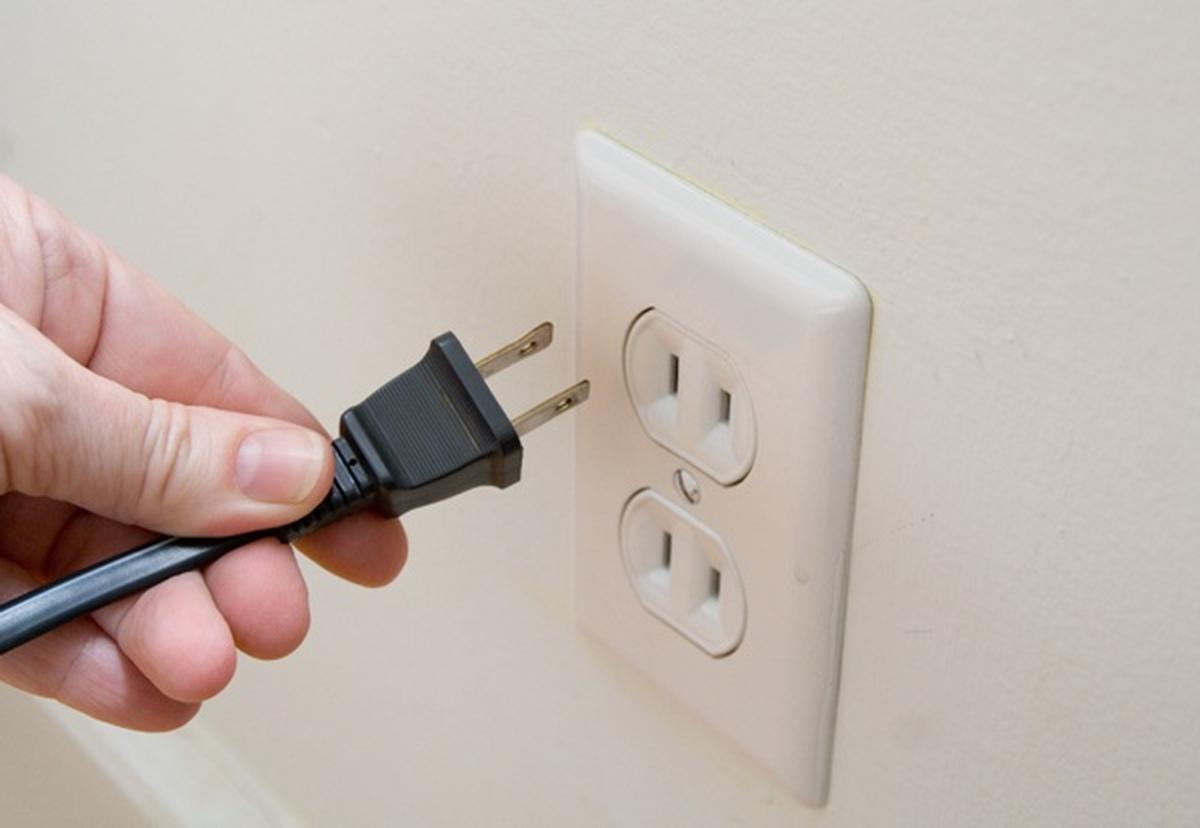
Fix 1. Unplug your computer
It sounds like a piece of cake thing to do, but it works! For most unrecognized USB devices, there is typically nothing wrong. A computer restart could solve it. This way is meant to reboot the motherboard, which has all of the computer hardware connected to, including the USB ports. Rebooting the motherboard usually helps solve the temporary insufficient power supply for outside devices.
Step 1. Cut your computer power at its source, which is unplugging your computer from the wall outlet.
Step 2. Leave the computer alone for a few minutes, and then replug it in the wall outlet for a restart.
Step 3. Now check if the computer can detect the USB device and assign a drive letter to it.
If this fix failed, don”t panic, the next methods are also doable.
Fix 2. Change the USB port
Is the computer”s USB port working properly? You need to check the available USB ports one by one to see whether it is a computer hardware problem or a problem with the device itself. If changing to another port solves the problem, then there is something wrong with the previous port. You can give up that broken port, or send your computer for repair.
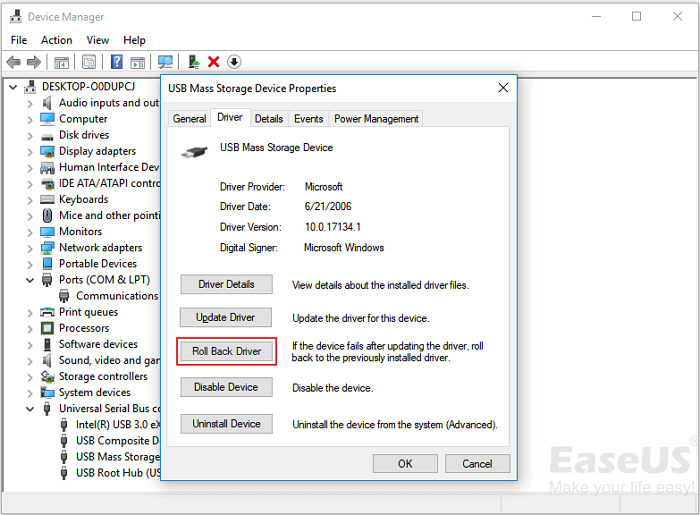
Fix 3. Update/Rollback a device driver
Device Manager operation is another widely suggested way to troubleshoot a non-recognizable USB device on Youtube and IT forums. Does this method apply to your situation? Go on to have a check.
Step 1. Type device manager in the search box to open Device Manager.
Or you can press Windows + R keys simultaneously to bring up the Run box, then type devmgmt.msc, and hit Enter.
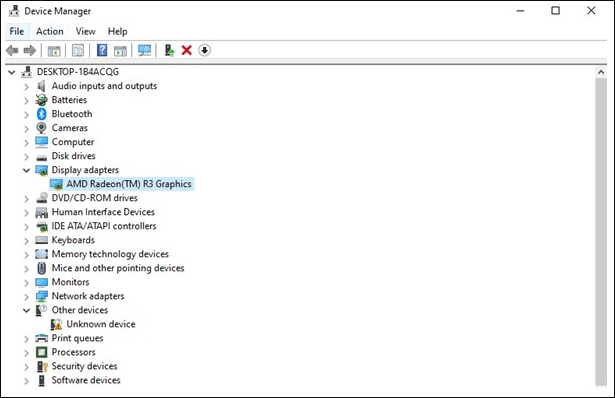
Step 2. Expand “Universal Serial Bus Controllers” and you will see the item called “Generic USB Hub”. Righ-click on the first Generic USB Hub and choose “Properties”.
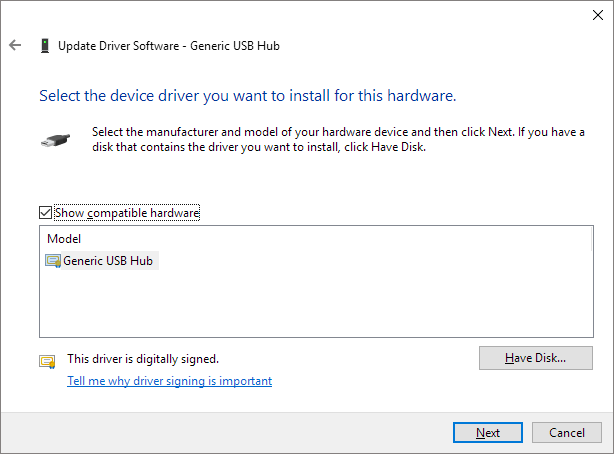
Step 3. Now, navigate to the “Driver” tab, choose “Update Driver“.
Step 4. When asked how do you want to search for driver software, there are two options.
1. Search automatically for updated driver software
This way is an automatic update by Windows. When it is finished, all you need to do is to disconnect the USB device, restart the computer and reconnect the USB device again. Windows will install the latest driver for you.
2. Browse my computer for driver software
When you choose this option, you need to continue with the other pop-up “let me pick from a list of device drivers on my computer.”
From the list, select Generic USB hub, which normally the only choice. Click “Next” and then Windows will install the driver for you.
TipIf updating the driver doesn”t help solve the USB device problem, try to update each Generic USB Hub until updated all for once.
In the same path to update the driver, you can also try to roll back to the previous driver before the error occurs. Instead of selecting “Update Driver” in the “Driver” tab, choose “Roll Back Driver” this time.
The changes made on the computer power and the device driver should take effect, and your USB device will no longer report issues. Otherwise, try the rest three methods one by one.
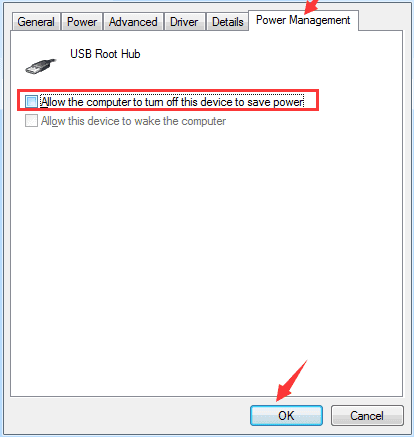
Fix 4. Fix USB Root Hub
The USB root hub is the software driver that lets you connect multiple USB peripherals to your computer. Most computers have multiple root hubs so you can share the data bus across multiple devices. So if the computer cannot recognize your USB drive, you can try to fix the USB root hub.
Step 1.
Xem thêm: Phần Mềm Seeding Facebook Dành Cho Fanpage Và Trang Cá Nhân, Phần Mềm Seeding Fanpage Hiệu Quả
Open Device Manager. Find the Universal Serial Bus controllers option and single-click it to expand.
Step 2. Find the USB Root Hub option in this category. Right-click it and choose Properties.
Step 3. Go to the Power Management tab and uncheck the “Allow the computer to turn off this device to save power” option. Then click OK to save your change.
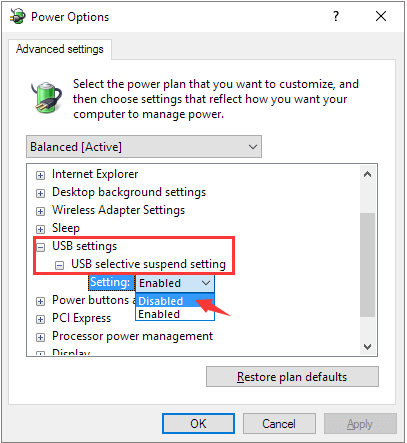
Fix 5. Change the USB Selective Suspend Settings
Another possible reason why your USB got malfunctioned is the hub driver suspends the USB automatically. In this case, change the USB selective suspend settings could help.
Step 1. Right-click on the Windows icon and click Power Options.
Step 2. In the Choose or customize a power plan windows, click Change plan setting.
Step 3. In the Edit Plan Settings window, click Change advanced power settings.
Step 4. In the Power Options window, find and expand USB settings, expand USB selective suspend settings and Disable both On battery and Plugged in settings.
Step 5. Then Click Apply and OK to save the settings.
Fix 6. Uninstall USB device driver to make USB recognized
Being different from the options of updating or degrading the driver version, uninstalling the driver could result in a total disability of all the USB ports. So take care of this last-try method.
Step 1. Open Device Manager (Right Click on Windows Logo and Click Device Manager).
Step 2. Now find and expand Universal Serial Bus controllers. Now right-click on USB drivers and click Uninstall. Do for all USB drivers one by one.
Step 3. Now, restart your PC. The USB drivers are automatically re-install and solve the corrupted USB devices problem.

Further Troubleshooting: Data Recovery
Those six ways we mentioned above are all the possible ways said to be helpful to fix the “USB device malfunctioned and not recognized” error.
If one of the fixes worked, you should be able to access your USB and use the saved data again.
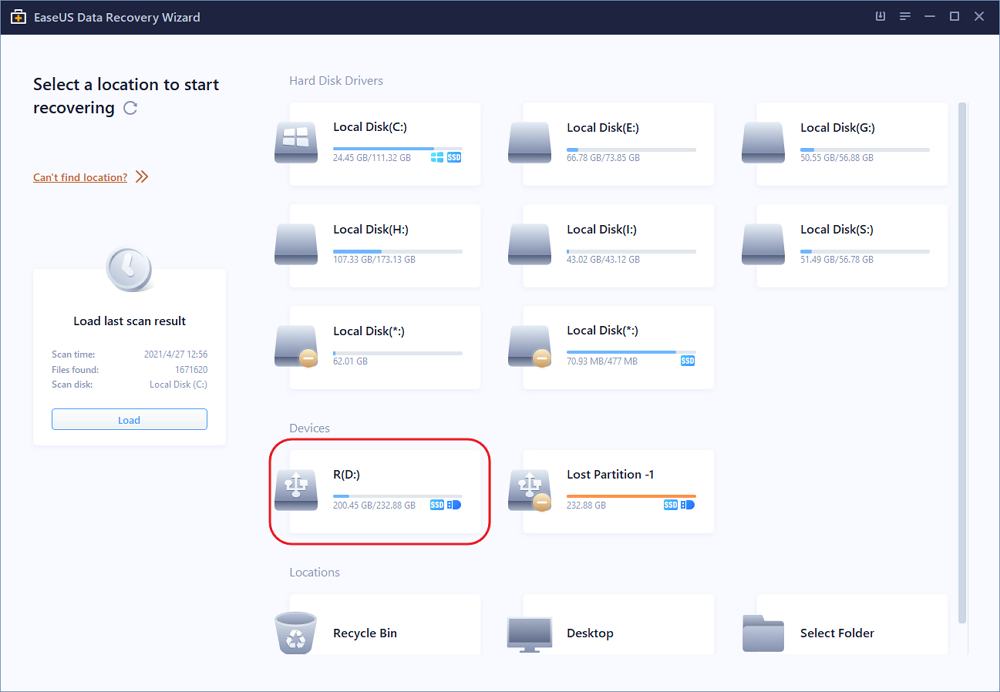
If you have solved the problem but find data missing happened with your USB flash drive. You need third-party software to retrieve your data. Here, au3d.vn disk data recovery can help even when your USB device is listed in disk management but not showing up on your computer. The program works well in Windows 10/8/7/XP and other previous versions.
Step 1. Run USB data recovery software.
Connect the USB flash drive to your computer and launch au3d.vn USB data recovery software on your PC. Select your USB drive which marks as a removable disk, and click “Scan” to start finding your lost files.
Step 2. Scan all lost files from USB.
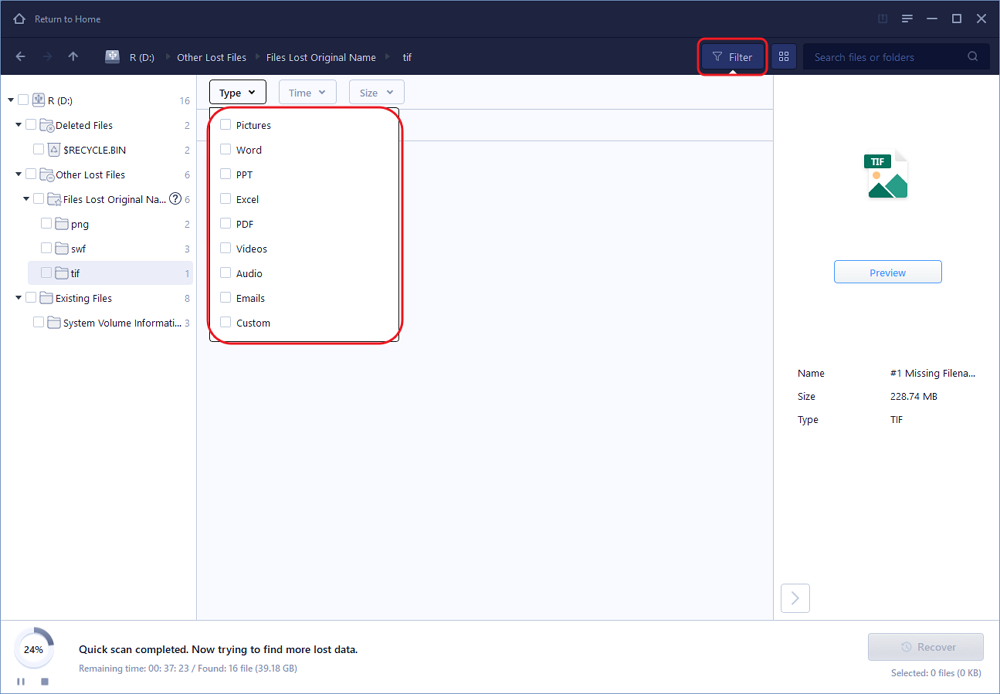
au3d.vn Data Recovery Wizard will thoroughly scan your USB flash drive and find all your lost data on it. After the scanning process, use the Filter feature to filter a specific file type. You can check and preview found USB files in this program.
Step 3. Restore all lost files from USB.
A double-click will allow you to preview the file results. Choose the target files and click “Recover” to save them to a secure location on your PC or other external storage devices.

To retrieve data from USB devices, we suggest you save retrieved files to another secure location in case of further problems.
Bonus Tip: Format USB to NTFS/FAT32 and recreate partition on USB
Some people encountered more serious issues than once. They said the same USB device starts malfunctioning again after a short period of time after the repair. If this is the case, formatting and recreating a new partition can help.
Connect the USB to the PC, right-click on This PC/My Computer and select Manage.Enter Device Manager, select Disk Management, locate and right-click on your malfunctioned USB, and select Format volume…Complete the Format process and set the file system to NTFS or FAT32.
Xem thêm: Cách Tải Game Gta – Tải Gta 5 Việt Hóa Full
Now you can check if the USB shows up on your computer or not, if not, continue with the steps below:
Open Disk Management, right-click on USB, and select Delete Volume, complete the process.When USB shows as unallocated, right-click on it and select New Simple Volume, set the drive letter and file system (NTFS/FAT32) for it, and complete the process.
After this, you should access the USB drive on your PC and save data on it again.